Preparing your Device with CrashPlan
While frequent and secure backup of your data is highly recommended, the School of Medicine backup to CrashPlan is not currently required. We will of course offer the service to anyone who wants it - and it is free of charge for School of Medicine affiliates. A full backup prior to encryption guards against data loss in the event of a failure during the encryption process. Backups also support investigations in cases when a computer is lost or stolen.
![]() HELP 725-8000
HELP 725-8000
Install CrashPlan on your Mac
We understand that computers used for Stanford business can contain personal information. The University has a very compelling interest in not accessing or storing your private data. In collaboration with the Privacy Office, the Information Security Office and the Office of General Counsel, workflows and policies have been established to protect your privacy and ensure that all aspects of the data security program adhere to University policy and state and federal law. Backed-up data will be only accessed as necessary to restore a computer at your direction, as part of a legitimate investigation, or as compelled by legal process.
If you have personal data on a computer that you do not want backed up to the School's CrashPlan system, you have the following options:
1. Remove your personal data from the computer before the CrashPlan backup proceeds. All Stanford data must remain on the computer and be available for backup.
2. Remove any personal data captured by the CrashPlan system after the backup and encryption of your computer has completed.
The CrashPlan application on your computer will allow you to identify any personal data that you do not want captured during subsequent backups. Any information so identified that had been previously backed up will be automatically and permanently deleted from the CrashPlan system, but will remain on the computer. All Stanford data must remain on the computer and be available for back up.
Once installed, the initial backup will begin automatically and may take several days to complete. You can use your computer normally throughout this backup. If you shut down your computer or put it to sleep, the backup process will continue when the machine becomes active.
If you have questions or concerns about using the Crashplan Pro software to back up a computer please call the IRT Help Desk at 650-725-8000.
It is of vital importance that you fully complete the backup of your computer. Failure to complete this step before encrypting your computer may cause irreparable damage to your machine.
A. Open the CrashPlan application
Under MacOS: Choose "Show CrashPlan" from the Crashplan icon in the menu bar at the top-right of the screen, or run CrashPlan from the Applications folder.
Once CrashPlan begins the back up, it scans the total number of files on your machine before proceeding with its initial backup, which may take several days to complete.
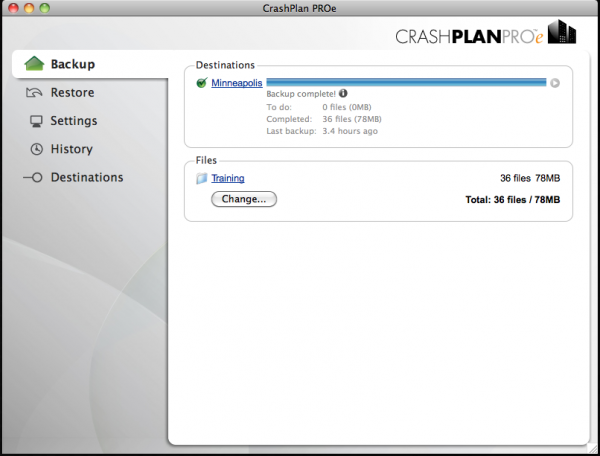
B. Check Progress Bar
As the backup proceeds, the progress bar under the BackUp tab will indicate how far along you are in the process. Before encrypting your computer, you should make sure all of the files initially scanned by CrashPlan have been backed up.
Note: CrashPlan is constantly backing up your files while you work. Since it cannot backup any documents that you may currently have open and be working on, the progress bar may not show the backup as being 100% complete, though all of the files initially scanned by CrashPlan have been backed up.

Simply download the CrashPlan installer (available below), mount the DMG drive, and double-click the "Uninstall" app.

A. Launch the PROe Client installer
Mount the CrashPlanPROe_Mac.dmg and double-click the PKG file. Download Installer
B. Create Your Backup User Account
Once install is complete, the PROe Client launches. You must create an account for backing up this device.
Note: If you have already enrolled one or more machines in the CrashPlan service, select the 'Existing Account' radio button and enter your SUNetID and password.
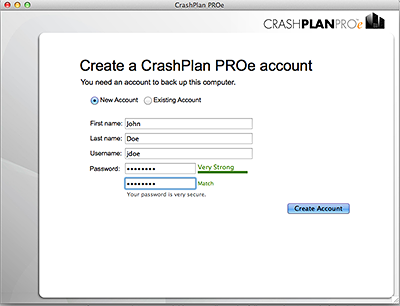
On the New Account screen:
- Enter the information required to create the backup account
- Username: SUNetID
- Password: SUNetID Password
- Click Submit to create your backup account.
C. Start Backup
From the Backup screen, click Start Backup to begin backing up the user home directory to your Master PROe Server. You can click Change to adjust the backup selection for files and folders.
The initial backup may take several days to complete. You can use your computer normally throughout this backup (as well as the other steps). If you shut down your computer or put it to sleep, the process will continue when the machine becomes active again.
Install CrashPlan on your PC
We understand that computers used for Stanford business can contain personal information. The University has a very compelling interest in not accessing or storing your private data. In collaboration with the Privacy Office, the Information Security Office and the Office of General Counsel, workflows and policies have been established to protect your privacy and ensure that all aspects of the data security program adhere to University policy and state and federal law. Backed-up data will be only accessed as necessary to restore a computer at your direction, as part of a legitimate investigation, or as compelled by legal process.
If you have personal data on a computer that you do not want backed up to the School's CrashPlan system, you have the following options:
1. Remove your personal data from the computer before the CrashPlan backup proceeds. All Stanford data must remain on the computer and be available for backup.
2. Remove any personal data captured by the CrashPlan system after the backup and encryption of your computer has completed.
The CrashPlan application on your computer will allow you to identify any personal data that you do not want captured during subsequent backups. Any information so identified that had been previously backed up will be automatically and permanently deleted from the CrashPlan system, but will remain on the computer. All Stanford data must remain on the computer and be available for back up.
Once installed, the initial backup will begin automatically and may take several days to complete. You can use your computer normally throughout this backup. If you shut down your computer or put it to sleep, the backup process will continue when the machine becomes active.
If you have questions or concerns about using the Crashplan Pro software to back up a computer please call the IRT Help Desk at 650-725-8000.
It is of vital importance that you fully complete the backup of your computer. Failure to complete this step before encrypting your computer may cause irreparable damage to your machine.
A. Open the CrashPlan application
Under Windows: Right-click on the CrashPlan icon in the system tray in the lower-right of the screen and select "Show Application", or run CrashPlan from the Start menu.
Once CrashPlan begins the back up, it scans the total number of files on your machine before proceeding with its initial backup, which may take several days to complete.
which may take several days to complete.B. Check Progress Bar
As the backup proceeds, the progress bar under the Backup tab will indicate how far along you are in the process. Before encrypting your computer, you should make sure all of the files initially scanned by CrashPlan have been backed up.
Note: CrashPlan is constantly backing up your files while you work. Since it cannot backup any documents that you may currently have open and be working on, the progress bar may not show the backup as being 100% complete, though all of the files initially scanned by CrashPlan have been backed up.
Removing CrashPlan (Windows)
1. Open Add and Remove Programs by clicking the Start button and typing “Add and Remove Programs.”
2. Click on the program called “CrashPlan ProE", and select “Uninstall”.
3. You will be asked to verify that you want to uninstall CrashPlan. Click "yes" to begin the uninstall process.
4. When the process completes, restart the computer.
A. Identify your Windows version
There are two versions of the CrashPlan installer, one for machines running 32-bit versions of Windows, and a second for machines running 64-bit versions of Windows.
To use the appropriate installer for your machine, you will first need to find out what version of Windows you are running.
- Click the Start button and select Control Panel
- Under the Control Panel, select System and Maintenance, and then System.
- Under System, you can see whether you are running 32-bit or 64-bit version of Windows.
B. Launch the PROe Client installer
Download the ZIP file that corresponds to your OS, unzip the contents and run the installer.
| Machines running 32-bit versions of Windows | Machines running 64-bit versions of Windows |
| Download Installer | Download Installer |
NOTE : You must unzip the contents into a separate folder for the installer to run correctly.
C. Create Your Backup User Account
Once install is complete, the PROe Client launches. You must create an account for backing up this device.
Note: If you have already enrolled one or more machines in the CrashPlan service, select the 'Existing Account' radio button and enter your SUNetID and password.
On the New Account screen:
- Enter the information required to create the backup account
- Username: SUNetID
- Password: SUNetID Password
- Click Submit to create your backup account.
D. Start Backup
From the Backup screen, click Start Backup to begin backing up the user home directory to your Master PROe Server. You can click Change to adjust the backup selection for files an folders
CrashPlan FAQs
While daily backups are part of the University's minimum security standards for endpoints, the School of Medicine does not require this backup be to the SoM instance of CrashPlan. We will, of course, still offer the CrashPlan service to anyone who wants it.
There are three ways to install CrashPlan Pro, the required backup services:
1. CrashPlan can be automatically installed on your computer using the BigFix management software. You will need to have BigFix installed.
2. An IT specialist can assist you. Please contact IRT at 725-8000.
3. There are step-by-step install directions for people who wish to install the software themselves.
The School of Medicine has created a tool called AMIE ("Am I Encrypted?") that will allow you to understand your compliance with the School of Medicine data security policies. The tool displays the information you supplied in your attestation and the BigFix, backup and encryption status of each of your computers. It also provides instructions to take actions to correct any issues that are detected. Please note that for a computer to report its status correctly, BigFix must be functioning properly and you will need to have completed the Device Identification Survey, which will appear as a BigFix popup on that machine. Please visit this site to see your current status: https://med.stanford.edu/datasecurity/amie/

It is of vital importance that you fully complete the backup of your computer. Failure to complete this step before encrypting your computer may cause irreparable damage to your machine.
A. Open the CrashPlan application
Under MacOS: Choose "Show CrashPlan" from the Crashplan icon in the menu bar at the top-right of the screen, or run CrashPlan from the Applications folder.
Once CrashPlan begins the back up, it scans the total number of files on your machine before proceeding with its initial backup, which may take several days to complete.
B. Check Progress Bar
As the backup proceeds, the progress bar under the BackUp tab will indicate how far along you are in the process. Before encrypting your computer, you should make sure all of the files initially scanned by CrashPlan have been backed up.
Note: CrashPlan is constantly backing up your files while you work. Since it cannot backup any documents that you may currently have open and be working on, the progress bar may not show the backup as being 100% complete, though all of the files initially scanned by CrashPlan have been backed up.
A robust data backup solution ensures that your data is safe during and after the encryption process. Backup protects against permanent data loss, in the event that your computer is lost, stolen, damaged, or suffers a technical failure. It also provides protection when data becomes corrupted or has been accidentally deleted.
Yes. The School of Medicine's data backup system is encrypted, properly secured, and monitored in a School of Medicine Data Center facility. The data can only be accessed by authorized IT staff.
We understand that computers used for Stanford business can contain personal information. The University has a very compelling interest in not accessing or storing your private data. In collaboration with the Privacy Office, the Information Security Office and the Office of General Counsel, workflows and policies have been established to protect your privacy and ensure that all aspects of the data security program adhere to University policy and state and federal law. Backed-up data will be only accessed as necessary to restore a computer at your direction, as part of a legitimate investigation, or as compelled by legal process.
We understand that computers used for Stanford business can contain personal information. The University has a very compelling interest in not accessing or storing your private data. In collaboration with the Privacy Office, the Information Security Office and the Office of General Counsel, workflows and policies have been established to protect your privacy and ensure that all aspects of the data security program adhere to University policy and state and federal law. Backed-up data will be only accessed as necessary to restore a computer at your direction, as part of a legitimate investigation, or as compelled by legal process.
If you have personal data on a computer that you do not want backed up to the School's CrashPlan system, you have the following options:
1. Remove your personal data from the computer before the CrashPlan backup proceeds. All Stanford data must remain on the computer and be available for backup.
2. Remove any personal data captured by the CrashPlan system after the backup and encryption of your computer has completed.
The CrashPlan application on your computer will allow you to identify any personal data that you do not want captured during subsequent backups. Any information so identified that had been previously backed up will be automatically and permanently deleted from the CrashPlan system, but will remain on the computer. All Stanford data must remain on the computer and be available for back up.
By default, the School of Medicine CrashPlan backup service will back up the contents of all local drives in the host computer. This includes all user files, applications, and other data. This is the safest policy in the event of a system failure, as anything that was on the machine can be restored from the backup server.
Some people may be uncomfortable storing personal information on a computer that backs up to the School's backup servers, though the School of Medicine will only access such information as necessary to restore a system at the user's direction, as part of a legitimate investigation, or as compelled by legal process.
Should you wish to exclude individual files or directories from your backups, you can do so from within the CrashPlan application. Files excluded in this manner will be automatically purged from the backup archive. Any personal data so identified that had been previously backed up will be automatically and permanently deleted from the backup system but will remain on the computer.
All Stanford data must remain on the computer and be available for back up.
A. Open the CrashPlan application
Under Windows: Right-click on the CrashPlan icon in the system tray in the lower-right of the screen and select "Show Application", or run CrashPlan from the Start menu.
B. Go to Files Section
In the Backup tab of the CrashPlan application there will be a section titled "Files" - this lists all the backup sources. By default, it will include the "C" drive on Windows machines. It may also include other drives or directories if there are multiple internal drives attached to the computer.
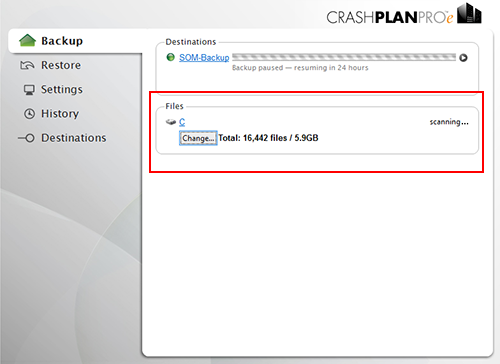
C. Click the "Change" button to bring up the Change File Selection dialog box
- You may un-check any files or folders that you do not want to back up.
- Click "Save" to save your changes.
- Warning: All Stanford data must be backed up - only use this function to exclude personal data that you do not want backed up.

The School of Medicine will only access such information as necessary to restore a system at your direction, as part of a legitimate investigation, or as compelled by legal process.
Once CrashPlan has been installed, it should start running and backing up your data. If you run the CrashPlan application, you should be able to see the current status on the Backup tab.
Not in any measurable way. The software is configured so that it uses minimal system resources whenever you are actively using your computer.
The School of Medicine's CrashPlan backup system is highly secure and is managed in a School of Medicine Data Center facility that is redundant and fault tolerant. It provides very rigorous protection for the Stanford's data and also the ability to perform thorough and efficient investigations in the unfortunate event that a computer is lost, stolen or compromised. The data in the backups can only be accessed by authorized IT staff according to strictly defined procedures overseen by the Privacy Office and the Office of General counsel in accordance with University policy and state and federal laws.
If you work with Restricted or Prohibited data, School of Medicine policy requires you to install the School's centrally managed CrashPlan software on all computers used for Stanford business. A full backup is necessary prior to encryption to guard against data loss in the event of a failure during the encryption process and to support investigations in cases when a computer is lost or stolen.
It is certainly possible to run additional backup that you manage (a common example is the use of a Time Capsule for Apple computers) and in most cases a second form of backup can co-exist with the School's Crashplan without problem. If you do run a personal backup, it is critical that those backups are encrypted if you use PHI or other restricted and prohibited data. Unencrypted backups that include this kind of data cannot be used.
In general the limit is 1TB per user. It may be possible to store more but we ask that a special request be made in these cases so we can insure the capacity available to other members of the School community is not negatively impacted. If the Crashplan Pro infrastructure is unable to accommodate special requests for large data sets we will work with you to find an alternate solution.
There are significant challenges posed by the proper management and data backup of large data sets. Meeting these challenges can be an expensive proposition. IRT will gladly work with you to identify a secure and scalable solution.
Yes, but be very careful - permanent data loss of your backups may occur. Please read the following very carefully.
You can add a second password, called an "archive password" as an additional layer of security for your backup. This is not a separate encryption password but a lock for the actual encryption password data. This differs from the standard CrashPlan account password, with which you can get assistance from IRT to access your backup if you can't recall your account password.
Important caveats:
1. If you enter an archive password for one of your devices, this will then apply to all devices you enroll in CrashPlan.
2. Once you establish an archive password, you can enter an optional recovery question and answer. You must know your archive password in order to set the optional archive question. This is important because if you cannot recall your archive password, no one at Stanford can assist you with your recovery. In this event, your backup is permanently lost and your only option will be to start your backups again as a new instance. Please be certain you understand and accept that you are solely responsible for this password.
3. You can only enable this option from the CrashPlan desktop application on your computer. The web console option for archive key password is not available.
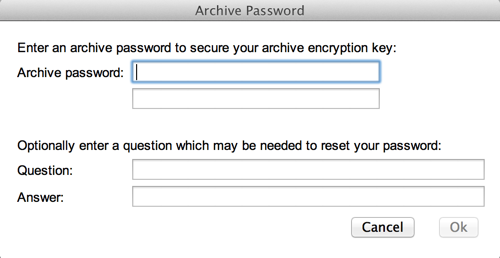
To enable the archive password:
Select the Security tab from the CrashPlan desktop application.
Select the second radio button "448-bit encryption + password" and Save.

You can then enter your archive password. At this screen, you can enter the optional Question and Answer so you can reset your password. Without this Question and Answer, there is no way to recover your archive password or access your backup.
You can run the CrashPlan software to restore files yourself, or you can request help with restoring files from your local IT support or via the IRT HelpSU form.
To restore a file or folder from one system or another or to a new computer (after the original one has been lost or stolen):
1. Download and install CrashPlan from the IRT Data Security page and log in
2. After starting the application, go to "Restore"
3. Select the computer you want to restore FROM. In the tree below, navigate to the folder or file you wish to restore (you can also select "Show hidden files"). You have a few choices of actions:
Restore the: Most Recent, or Choose a date/time
Version to: Desktop, Original location, a folder (desktop)
Rename any existing file
Tip: It is generally a good idea to restore files to a folder you've created before starting this process.
** Remember that Restricted or Prohibited data (PHI/PII/other) should only be restored to an encrypted system. **
Yes, we have configured our service to permit remote users to be able to perform data backups. In rare instances, a network firewall at a remote location could be configured to block access, and you may want to either try and get that changed, or use VPN software to reach our service.
Technically, yes. But if you choose to do so, please be extra careful. For example, you could conceivably set your backup software to exclude important files (in which case they would not be restorable). Settings can be found in the CrashPlan software on your computer.
All computers that store Stanford data must be backed up.This includes both Stanford owned devices, and personally owned devices that might store or access Protected Health Information (PHI) and other Restricted or Prohibited data, inlcuding any device used to access the SHC and SCH Epic systems.
If you have been using a Stanford-owned computer, that computer will be turned in to your supervisor, and they may access or pass along the data used in the course of your work. Your data backup will remain on the School's servers, should it need to be restored. If you have been using a personally-owned computer, you will presumably be turning your Stanford data over to your supervisor, and removing it from your computer. You can then uninstall the CrashPlan software and BigFix. Your data backup will remain on the School's servers, should it need to be restored.