Download and Install Print Drivers
In order to print from your personal device, you will need to download and install the correct print driver, for Mac only. Windows, the driver will download automatically once connected to the server
Once you've completed the download, double-click on the file to extract the disk image with the package installer. Click on the installer file to start the install process. Click Continue.
Mac:
https://vptlprinting.stanford.edu/drivers/mac/PS_v04.06.01_MAC.zip
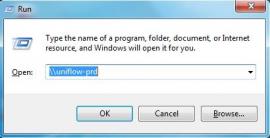
Add the Print Queue for Windows
- Press Windows + r to open up a Run command window. Input into the address field \\uniflow-prd, and press return to install the print queue and driver.
- When you are prompted for credentials, please enter them in this format:
Username: win\<Your SUNetID> (replace <Your SUNetID> with your Stanford SUNetID, which will then make your username look something like "win\jdoe")
Password: <your usual Stanford password>
- Remember my credentials: CHECKED

- Double-click (or Right-click and select Connect) the SecurePrint printer from the selection of printers on the print server.


Add the Print Queue for OSX
- Click on the Apple icon in the upper-left corner of your screen and select System Preferences. Click on Printers & Scanners.
- Click on the + icon and then select Add Printer or Scanner to add a new printer.
- Right-click in the blank space next to the Default, IP, and Windows icons in the toolbar area. Select Customize Toolbar.

- Drag the Advanced icon to the toolbar. Press Done.

- Click on the Advanced icon. Select LPD/LPR Host or Printer from the Type drop-down menu.
- Enter in lpd:
//<Your-SUNetID>@vptlprinting.stanford.edu/SecurePrint in the URL field, replacing <Your-SUNetID> with your Stanford SUNetID, which will make the text look something like "lpd://jdoe@vptlprinting.stanford.edu/SecurePrint".
- Name the printer a user-friendly name of your choice.
- Select the Select Software in the Use drop-down menu.
- Type in the model of printer into the Filter search box and select the correct PS driver. Click Add.
- When asked to allow changes to your computer, select Yes.

