Your computer needs a unique Internet address in order for it to work on Stanford's computer network (SUNet). To get a valid Internet address assigned to your computer, you need to configure the TCP/IP protocol and determine your Ethernet hardware address (also known as a MAC address). Then, you must register your Ethernet hardware address for on-campus use in order for your computer to operate on SUNet.
Note: You must be logged on as an administrator or a member of the Administrators group in order to complete this procedure.
Configuring the TCP/IP protocol and determining your Ethernet address
- Click the Windows Start button and then click Control Panel.
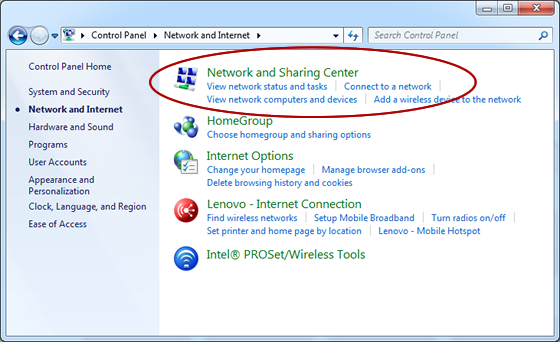
- Click Network and Internet.
Note: If you are using the large or small icon view, you see the control panel icons instead of categories. Double-click the Network and Sharing Center icon and go to step 4.

- Click Network and Sharing Center.
- In the View your active networks section, click the link for Local Area Connection.

- When the Local Area Connection Status dialog box is displayed, click Properties.

- In the Local Area Connection Properties dialog box, do the following:
- Verify that the Internet Protocol Version 4 (TCP/IPv4) box is checked.
- Hover your mouse over the adapter listed in the Connect using box to display the hardware Ethernet MAC (Media Access Control) address. Make note of this address because you will need it to register your computer for use on the Stanford network.
Note: This is the easiest way to determine your Ethernet address, although an alternate method is provided.
- Select Internet Protocol Version 4 (TCP/IPv4) and then click Properties.

- Verify that the Internet Protocol Version 4 (TCP/IPv4) box is checked.
- In the Internet Protocol Version 4 (TCP/IPv4) Properties dialog box:
- Click Obtain an IP address automatically.
- Click Obtain DNS server address automatically.

- Click OK to exit the Internet Protocol Version 4 (TCP/IPv4) Properties dialog box.
- Click Close to exit the Local Area Connection dialog box, and then click Close to exit the Local Area Connection Status dialog box.
Determining your Ethernet address - alternate method
Note: You can skip this step if you obtained your hardware Ethernet (or MAC) address while configuring TCP/IP or if you already know it.
To determine your hardware Ethernet address:
- Click the Windows Start button.
- In the Search box, type cmd and then press the ENTER key on your keyboard.
- At the C:\ prompt, type ipconfig /all and press ENTER.
- The next screen displays information about your computer configuration. Locate the Ethernet adapter Local Area Connection section. Your twelve-digit, hardware Ethernet address is in the Physical Address field of this section.
In the following example, the Ethernet address is
00-0C-29-A7-DF-48.
- Close the window.
Registering your Ethernet address
You will not be able to use your computer on the Stanford network until your hardware Ethernet address is registered.
- Faculty and staff: Give your hardware Ethernet address and other configuration information to your Local Network Administrator (LNA).
- On-campus students: You must register your connections online at:
- Off-campus students: Submit a HelpSU request to the Stanford IT Help Desk. Be sure to include your hardware Ethernet address in the request description.
Graduate students living off campus who use their computer primarily in a department office should try contacting their LNA first.