Securing Your Mac
Stanford University policy requires all laptops and desktops used on the Stanford network be encrypted. Further, all laptops and desktops that may be used to interact with PHI and other High or Moderate Risk data by SoM staff and affiliates must be encrypted using methods approved by the School of Medicine. These requirements apply to all computers, whether Stanford-owned or personally-owned.
To make sure you are meeting the security requirements, choose your set of instructions below, based on what kinds of data you use in your work.
(For definitions of High, Moderate, and Low Risk Data, consult the Data Classification chart.)
Note: In order to encrypt your Mac with FileVault 2, it must be running MacOS 10.9 or above.
Step-by-step directions and installer files are available below, so that you can complete the process and install the required software yourself. If you would like assistance with encrypting your computer, you can contact your departmental IT staff or reach out to IRT. (Please note that for some computers, there may be a risk of data loss if there are problems during the encryption process, so we highly recommend backing up your computer before you begin.)
Complete Data & Device Attestation
The School will be using the information you submit in the Data and Device Attestation to deploy the various aspects of the Data Security Program. It is therefore imperative that your attestation accurately reflect your use of data and your devices at all times. Please only report the Stanford-owned and personally-owned devices that you use for school business; you do not need to report devices owned by SHC or LPCH. You can update your information at any time by visiting the Attestation Survey »
Install BigFix
You are required to have the BigFix patch management software installed on all encrypted computers used for Stanford business, including personally-owned computers. BigFix should not be installed on computers owned by SHC or LPCH. BigFix will be automatically installed as part of the SWDE installer, but to speed up the process, you can install it beforehand, using the BigFix Installation guide »
Complete Data Identification Survey
This survey helps identify the specific computer(s) you use for Stanford business, and the types of data stored locally on each machine. It will be delivered to you via a BigFix pop-up screen, or as part of the SWDE installer. You can update your answers for each computer's survey through the BigFix dashboard on that computer. For more info, see BigFix Dashboard »
Install CrashPlan (for data backup)
School policy very strongly recommends that all Stanford data stored on encrypted desktop and laptop computers be backed up to the School's enterprise backup system before the encryption process begins. For install directions, see CrashPlan Guide »
Verify CrashPlan Completion
It is of vital importance that you fully complete the backup of your computer. Failure to complete this step before proceeding may cause irreparable damage to your machine.
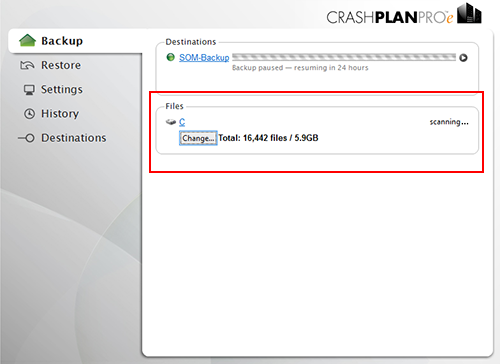
A. Open the CrashPlan application
Under MacOS: Choose "Show CrashPlan" from the Crashplan icon in the menu bar at the top-right of the screen, or run CrashPlan from the Applications folder.
Once CrashPlan begins the back up, it scans the total number of files on your machine before proceeding with its initial backup, which may take several days to complete.
B. Check Progress Bar
As the backup proceeds, the progress bar under the BackUp tab will indicate how far along you are in the process. Before encrypting your computer, you should make sure all of the files initially scanned by CrashPlan have been backed up.
Note: CrashPlan is constantly backing up your files while you work. Since it cannot backup any documents that you may currently have open and be working on, the progress bar may not show the backup as being 100% complete, though all of the files initially scanned by CrashPlan have been backed up.

Check Disk Health
Once backup is complete, a series of tests will need to be run on your hard drive to be sure it is ready for encryption. This check will look for problems with your disk and data using diagnostic tools available natively within the operating system of your Mac.
Overview
The Disk Health test will look for problems with your disk and data using diagnostic tools available natively within the operating system of your machine. If a problem is found you should not proceed to the encryption step and you should call the IRT Service Desk at 650-725-8000 for assistance. This step can take anywhere from 15 minutes to several hours to complete and you may notice some degradation of performance while it is running.
Check Filesystem for Errors
To check the MacOS filesystem for errors, use Disk Utility to perform a filesystem check, otherwise known as a 'fsck'.
Note: This step can take anywhere from 15 minutes to several hours to complete and you may notice some degradation of performance while it is running.
- Open Disk Utility from the Utilities folder in the Applications folder.
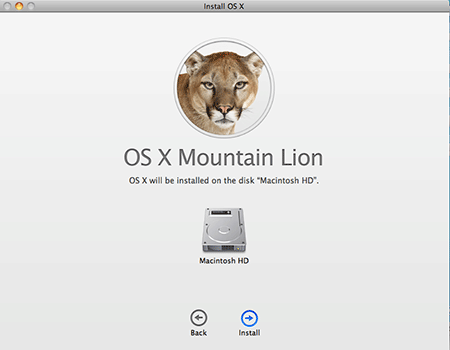
- Select the hard disk (often "Macintosh HD" but can be named something else).
- Choose "Verify Disk" from the "First Aid" tab.
- Inspect the output for errors (which will be colored in red).
- If a problem is found, please contact the IRT Service Desk for assistance in repairing the issues.

Upgrade OS to 10.9
If your computer is not eligible for a 10.9 upgrade, do not continue the manual install. Please contact IRT for further assistance. See Details for upgrade eligibility requirements and for OS 10.9 installation instructions.
A. 10.9 Upgrade Requirements
Your Mac must be running OS X 10.6.8 or later, and also be one of the following models:
- iMac (Mid 2007 or newer)
- MacBook (Late 2008 Aluminum, or Early 2009 or newer)
- MacBook Pro 13-inch (Mid-2009 or earlier)
- MacBook Pro 15-inch (Mid/Late 2007 or newer)
- MacBook Pro 17-inch (Late 2007 or newer)
- MacBook Air (Late 2008 or newer)
- Mac mini (Early 2009 or newer)
- Mac Pro (Early 2008 or newer)
- Xserve (Early 2009)
B. Verify Eligibility
You can find out if your current Mac qualifies by clicking the Apple icon at the top left of your screen, choosing About This Mac, then clicking More Info.
i. On Lion, you will see a window showing the model name and specifics:

ii. On MacOS 10.6 Snow Leopard and earlier, you will see a system profile window that includes the Model Identifier. You can then look up that Model Identifier at [this site].

C. Purchase license
MacOS 10.9 is not a free upgrade for users of previous OS releases. Any users running an OS earlier than 10.6.8 should update to Snow Leopard and install it first; subsequent updates can only go through the Apple App store.
To buy an individual license, point a web browser at the App Store Link.
Organizations wishing to purchase 20 or more licenses at a time can purchase Volume Licenses for $9.99/seat through SmartMart. Click on the Apple punch-out, then search for item D6358Z/A.
Once Volume Licenses are purchased, the purchaser will receive redemption codes from Apple and can distribute them to their staff. Staff will open the App Store, click "Redeem" under "Quick Links" and enter the redemption code to be credited for a Mountain Lion download.
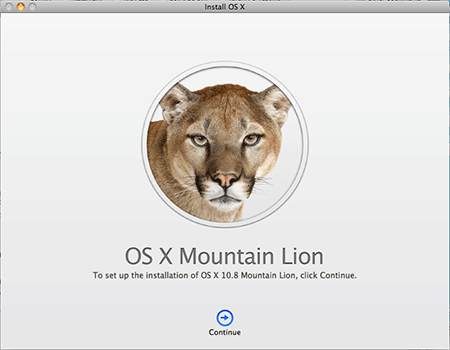
D. Install Mountain Lion
After purchasing Mountain Lion, the App Store will download Install OS X Mountain Lion.app (~4.4GB) into the /Applications folder. It will also launch the installer immediately.
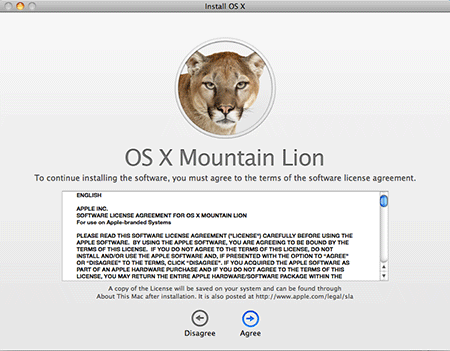
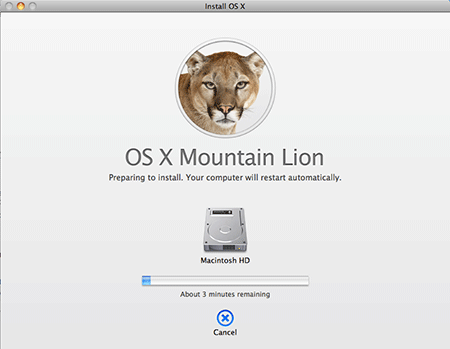
The following screens should be clicked through, then the machine will reboot. On reboot, it will install the new OS version and reboot once more.
This whole process takes around half an hour on a reasonably modern machine with SSD (Macbook Pro dual-core-i7, 4GB RAM, 256GB SSD) - expect it to take longer on older and slower hardware.
Install Stanford Whole Disk Encryption
The Stanford Whole Disk Encryption installer helps you enable FileVault, which uses Apple's built-in encryption technology to encrypt the whole disk. Whole disk encryption protects all data on a hard disk from unauthorized access in the event the computer is lost or stolen. If your computer is not at least OS 10.9, the SWDE installer will refuse to run. In that case, please contact IRT and do not continue the manual install.
Overview
If your machine is not capable of encryption using FileVault Encryption, or you have any questions about the encryption process, please contact the IRT Service desk at 725-8000.
If your computer is already encrypted with one of the School's standard methods, you do not need to take any further action at this time. This will be registered in BigFix and your machine will be recorded as fully compliant with the data security policy.
If a computer is currently encrypted with a method other than one of the School's standard methods, it does not need to be re-encrypted at this time. If you wish to switch to SWDE, which involves software built into your operating system, IRT can help you uninstall older encryption software first, such as Macafee Endpoint or PGP.
Encryption will be installed using Stanford's SWDE ("suede") Installer. To provide the highest level of privacy protection for High and Moderate Risk data, the installation process includes setting vital configuration options designed to protect your computer. You will be notified of any changes to settings during the process and will have the option of canceling if you'd like to ask any questions about them.
As part of the SWDE installer, an encryption key will be stored which can be used to access your data if you forget your password. Stanford will store this key securely and it will be only be used in accordance with University privacy policies to restore data at your direction, as part of a legitimate investigation, or as compelled by legal process.
For a general overview of what SWDE does, and what to expect, see: Getting Started With SWDE »
For a full list of operations performed by this installer, see: Mac Requirements »
A. Download encryption installer
Before starting the installation, make sure your computer is on AC power and has an active network connection.
Whole Disk Encryption can take up to 10 hours, so you may want to install the the software at the end of the day and let the encryption run overnight. You can use your computer during the encryption process, but certain activities may be noticeably slower.
B. Launch SWDE installer: Enrollment
Launch the installer and follow along with the step-by-step instructions at: SWDE for Mac »
If you need help, call the IRT Service Desk at 725-8000 x5
Verify your Computer's Compliance
You can verify whether a computer is backed up and encrypted by looking at the AMIE (Am I Encrypted?) compliance tool. For a computer to report its status correctly, BigFix must be installed and functioning properly and you will need to have completed a Device Identification Survey for that machine. See: AMIE compliance tool »
Remove Personal Data from CrashPlan Backup
Should you wish to exclude personal files or directories from your backups, you can do so from within the CrashPlan application after the initial backup and encryption process is completed. Files excluded in this manner will be automatically purged from the backup archive.
A. Overview
By default, the School of Medicine CrashPlan backup service will back up the contents of all local drives in the host computer. This includes all user files, applications, and other data. This is the safest policy in the event of a system failure, as anything that was on the machine can be restored from the backup server.
Some people may be uncomfortable storing personal information on a computer that backs up to the School's backup servers, though the School of Medicine will only access such information as necessary to restore a system at the user's direction, as part of a legitimate investigation, or as compelled by legal process.
Should you wish to exclude individual files or directories from your backups, you can do so from within the CrashPlan application. Files excluded in this manner will be automatically purged from the backup archive. Any personal data so identified that had been previously backed up will be automatically and permanently deleted from the backup system but will remain on the computer.
All Stanford data must remain on the computer and be available for back up.
B. Open the CrashPlan application
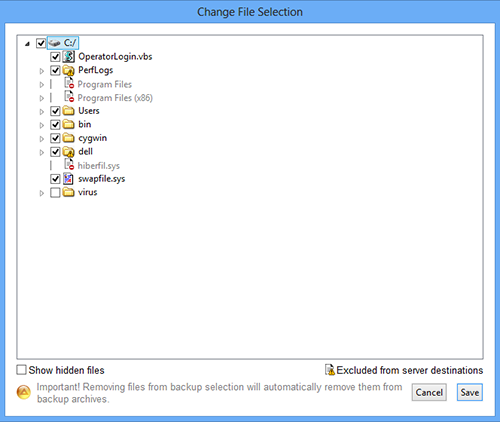
Under MacOS: Choose "Show CrashPlan" from the Crashplan icon in the menu bar at the top-right of the screen, or run CrashPlan from the Applications folder.C. Go to Files Section
In the Backup tab of the CrashPlan application there will be a section titled "Files" - this lists all the backup sources. By default, it will include the "/" directory on MacOS machines. It may also include other drives or directories if there are multiple internal drives attached to the computer.
D. Click the "Change" button to bring up the Change File Selection dialog box
- You may un-check any files or folders that you do not want to back up.
- Click "Save" to save your changes.
- Warning: All Stanford data must be backed up - only use this function to exclude personal data that you do not want backed up.
If you don't access High or Moderate Risk Data with your Mac, there are fewer Stanford-mandated security requirements. The steps are fairly simple to complete and are mostly automated through the installers. In some cases, additional assistance from an IT specialist may be required.
Complete Data & Device Attestation
The School will be using the information you submit in the Data and Device Attestation to deploy the various aspects of the Data Security Program. It is therefore imperative that your attestation accurately reflect your use of data and your devices at all times. Please only report the Stanford-owned and personally-owned devices that you use for school business; you do not need to report devices owned by SHC or LPCH. You can update your information at any time by visiting the Attestation Survey »
Encryption
You must encrypt your computer if:
- 1. Your computer is owned by Stanford (whether or not you use it to access High or Moderate Risk data).
- 2. You personally own your computer, and you use it on the Stanford network. (For now, VPN does not count as part of the Stanford network.)
If you use your computer for Stanford work, but not for ANY High or Moderate Risk data, and you ONLY use it at home or otherwise remotely, you can still make use of Stanford's SWDE encryption for your own security, but it is not required.
For encryption help and a complete walkthrough, visit the Stanford SWDE page »
If your computer is indeed not used to access High or Moderate Risk data, you may choose to use the VLRE installer instead; it is similar to SWDE, but does not require the use of BigFix. Stanford will still have a record of your encryption status, but without BigFix you are left to update your security patches and such on your own.
For VLRE help and a walkthrough, visit the Stanford VLRE page »
Backups
Using CrashPlan for secure, automated backups is highly recommended, though not required. For Stanford Medicine faculty, staff, students, and affiliates, it's even a free service. Sign up for CrashPlan here »
Verify your Computer's Compliance
You can verify whether a computer is backed up and encrypted by looking at the AMIE (Am I Encrypted?) compliance tool. For a computer to report its status correctly, BigFix must be installed and functioning properly and you will need to have completed a Device Identification Survey for that machine. See: AMIE compliance tool »
Remove Personal Data from CrashPlan Backup
Should you wish to exclude personal files or directories from your backups, you can do so from within the CrashPlan application after the initial backup and encryption process is completed. Files excluded in this manner will be automatically purged from the backup archive.
A. Overview
By default, the School of Medicine CrashPlan backup service will back up the contents of all local drives in the host computer. This includes all user files, applications, and other data. This is the safest policy in the event of a system failure, as anything that was on the machine can be restored from the backup server.
Some people may be uncomfortable storing personal information on a computer that backs up to the School's backup servers, though the School of Medicine will only access such information as necessary to restore a system at the user's direction, as part of a legitimate investigation, or as compelled by legal process.
Should you wish to exclude individual files or directories from your backups, you can do so from within the CrashPlan application. Files excluded in this manner will be automatically purged from the backup archive. Any personal data so identified that had been previously backed up will be automatically and permanently deleted from the backup system but will remain on the computer.
All Stanford data must remain on the computer and be available for backup.
B. Open the CrashPlan application
Under MacOS: Choose "Show CrashPlan" from the Crashplan icon in the menu bar at the top-right of the screen, or run CrashPlan from the Applications folder.C. Go to Files Section
In the Backup tab of the CrashPlan application there will be a section titled "Files" - this lists all the backup sources. By default, it will include the "/" directory on MacOS machines. It may also include other drives or directories if there are multiple internal drives attached to the computer.
D. Click the "Change" button to bring up the Change File Selection dialog box
- You may un-check any files or folders that you do not want to back up.
- Click "Save" to save your changes.
- Warning: All Stanford data must be backed up - only use this function to exclude personal data that you do not want backed up.

Frequently Asked Questions
If you have a Mac with a multi-volume or multi-drive configuration, you will need to take the following steps to ensure its full encryption and compliance with school policy. Please read these steps carefully and contact your local IT if you are not comfortable with any of them, or if you encounter any issues during the encryption process.
1. Backup Verification
It is important that the volume to be encrypted has a good backup before you begin encryption. You can verify the backup of a particular volume or drive on your machine through the CrashPlan application.
A. Under MacOS: Choose "Show CrashPlan" from the Crashplan icon in the menu bar at the top-right of the screen, or run CrashPlan from the Applications folder.
B. Once you log into CrashPlan, the initial screen will show a list of all of the volumes and internal drives that have been backed up.
2. Enable encryption of volume
A. Locate the icon for the volume to be encrypted using the Finder window. You may need to navigate down to the computer-level view of your machine to see this icon.
B. Right-click on the volume icon, and choose Encrypt "Volume Name" from the drop-down menu.
C. You will be prompted to enter a password to protect the volume. Use a complex, long password. If the Filevault recovery key is available, it could be used as the password.
D. Once you enter the password, the volume will being encrypting. Encryption will take anywhere from 24-36 hours. Please leave your machine on and attached to a power source overnight to facilitate this process.
While there isn't a ready mechanism to determine percentage complete, if you are comfortable with terminal, you can use the command [diskutil corestorage list | grep "Conversion Status:"] to get the status of the volume encryption.
3. Set up automatic mount for the encrypted volume
Once the volume is encrypted, by default, you will need to enter a password in order to view it. If you prefer, however, you do however have the option to set up an automatic mount of the volume.
A. Reboot the machine. You will be asked if you want to mount the volume.
B. Enter the volume password and select the checkbox to save the password to the key chain. This will enable the volume to mount automatically when you next login.
C. If there are multiple user accounts on this computer and the accounts need to be able to access this volume, this step should be repeated for each user account.
In recognition that the computing environment at the School of Medicine is complex, formal exceptions can be granted on a case-by-base basis for devices that perform functions that might be impacted by encryption. This would include computers running specialized lab equipment, real-time research data collection and other special cases. All devices must be appropriately secured but IRT's security team will work to determine alternative methods for these cases. To apply for an exception, please see the Exceptions Request Form.
Data security is a critical priority for the School of Medicine and Stanford University at large. Stanford University policy states that all computers and devices used for Stanford business by University employees must be encrypted. This includes both Stanford-owned and personally-owned machines.
Additonally, the School of Medicine's Data Security policy states that anyone who attests to working with Stanford's High or Moderate Risk Data (including PHI) must back up and encrypt all computers and mobile devices used for Stanford work, whether Stanford owned or personally owned.
Even though is it is possible to access EPIC, CERNER and other tools through secure portals, a machine that is owned by an individual or by Stanford that is used regularly for Stanford work has a high likelihood of storing Stanford's PHI either now or in the future and the potential consequences if that data is compromised are severe. It is very common for an individual computer user to not be fully aware of all the data that is stored, even temporarily, on their devices but that can be discovered upon investigation. The School has established this policy to protect patients, the Institution and individual faculty, students and staff.
If you have personal data on a computer that you do not want backed up to the School's CrashPlan system, you have the following options:
1. Remove your personal data from the computer before the CrashPlan backup proceeds. All Stanford data must remain on the computer and be available for backup.
2. Remove any personal data captured by the CrashPlan system after the backup and encryption of your computer has completed.
The CrashPlan application on your computer will allow you to identify any personal data that you do not want captured during subsequent backups. Any information so identified that had been previously backed up will be automatically and permanently deleted from the CrashPlan system, but will remain on the computer. All Stanford data must remain on the computer and be available for back up.
Directions on how to remove personal data from the CrashPlan system is available in the Backup FAQs »
Encryption is a technique that makes data technically inaccessible to those without valid permissions. You need to encrypt in order to comply with the School of Medicine policy and legal requirements. Encryption protects you and Stanford in the event that your device is lost or stolen.
No. Passwords are an important part of computing security, but they are insufficient. It is far too easy for someone to bypass a password.

