Before you can connect to the Stanford VPN you should:
- Install Mobile Device Management (MDM) on your Android device
- Install the free Cisco AnyConnect app
- Configure the AnyConnect app for the Stanford VPN
Install MDM
Install and configure AnyConnect
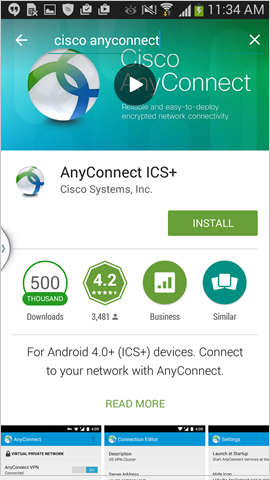
- Go to the Google Play Store and search for Cisco AnyConnect.
- Choose the AnyConnect ICS+ app and tap Install.
Note: Our testing shows that AnyConnect ICS+ does not work with HTC Android devices.
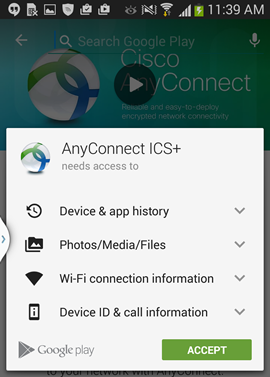
- If prompted, tap Accept to give AnyConnect permission to access other apps.
- Tap Open and accept the license agreement if one is presented.
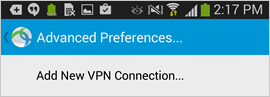
- Choose to add a new VPN connection by tapping Connection.

- If the Advanced Preferences screen displays, tap Add a New VPN Connection.
- Enter the following information:
- Description: label the configuration with a unique identifier (for example, Stanford VPN)
- Server Address: https://su-vpn.stanford.edu
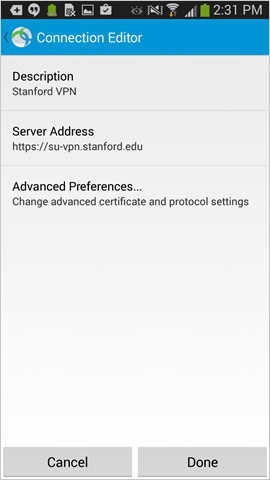
- Tap Done.
Connect to the Stanford VPN
- Open the AnyConnect app.
- Tap the AnyConnect VPN Off button.
- When prompted for your username and password, enter the following and then tap Connect:
- Group: choose Default Stanford split-tunnel or Full Traffic (non-split-tunnel)
- Default Stanford split-tunnel: access to anything at stanford.edu is via the VPN connection but non-Stanford traffic flows normally on an unencrypted internet connection.
- Full traffic non-split-tunnel: all internet traffic flows through the VPN connection.
- Username: your SUNet ID
- Password: your SUNet ID password

- Group: choose Default Stanford split-tunnel or Full Traffic (non-split-tunnel)
- Next the prompt for two-step authentication displays.
- Enter a passcode or enter the number that corresponds to another option and then tap Continue (in this example, enter 1 to authenticate using Duo Push).
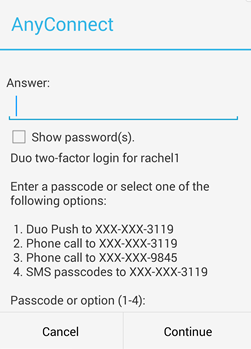
- If your only registered authentication method is printed list, hardware token, or Google Authenticator, the list of options does not display. Enter a passcode and tap Continue.
- You may see a truncated menu if you have multiple two-step devices enabled. Enter a passcode or choose a second factor from the options provided and then tap Continue (in this example, enter push1 to authenticate using Duo Push).
Note: It may take a bit of trial and error to associate secondary factors with devices.
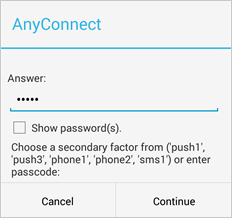
- Enter a passcode or enter the number that corresponds to another option and then tap Continue (in this example, enter 1 to authenticate using Duo Push).
- Tap Accept to connect to the Stanford VPN.

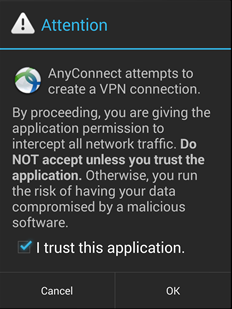
- If you see a message seeking your attention, tap I trust this application and then tap OK.
- When you are connected to VPN, the AnyConnect app shows the VPN as turned on.

Disconnect from the Stanford VPN
To disconnect from the Stanford VPN, open the AnyConnect app and tap the On button. It toggles to Off, disconnecting your device from the Stanford VPN.