The following instructions apply to Windows Phone 7, 7.8, 8, and 8.1.
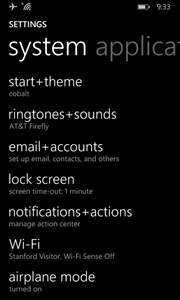
- From the Start screen, flick right to the App list. Scroll down and tap Settings.

- In Settings, under the system menu, scroll down and tap e-mail + accounts.
- Tap add an account and then tap Exchange.

- Enter the following information and then tap sign-in:.
- Email address: your SUNet ID@stanford.edu
- Password: Stanford (do not enter your SUNet ID password here)

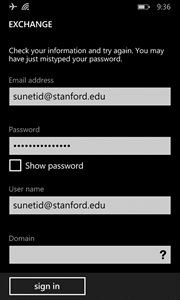
- An error message results. Enter the following information and then tap sign-in.
- Email address: your SUNet ID@stanford.edu
- Password: Stanford (do not enter your SUNet ID password here)
- User name: your SUNet ID@stanford.edu
- Another error message results. Tap advanced.

- Ensure that your User name is your SUNet ID@stanfor.edu. In the Server field, enter: outlook.office365.com.

- Tap show all settings.
- Scroll down and enter your SUNet ID password.
- Change other settings if you wish, including your Account name, how frequently to Download new content, how often to sync, and what content to sync.

- Tap sign in. An icon is added to your Start screen and your selected content (Email, Calendar, Contacts, Tasks) starts to sync. The first sync may take several minutes.